这篇教程从PointNet到PointNet++理论及代码详解写得很实用,希望能帮到您。
从PointNet到PointNet++理论及代码详解
Pytorch代码:https://github.com/yanx27/Pointnet2_pytorch
更详细的代码解析:这里
1. 点云是什么
1.1 三维数据的表现形式
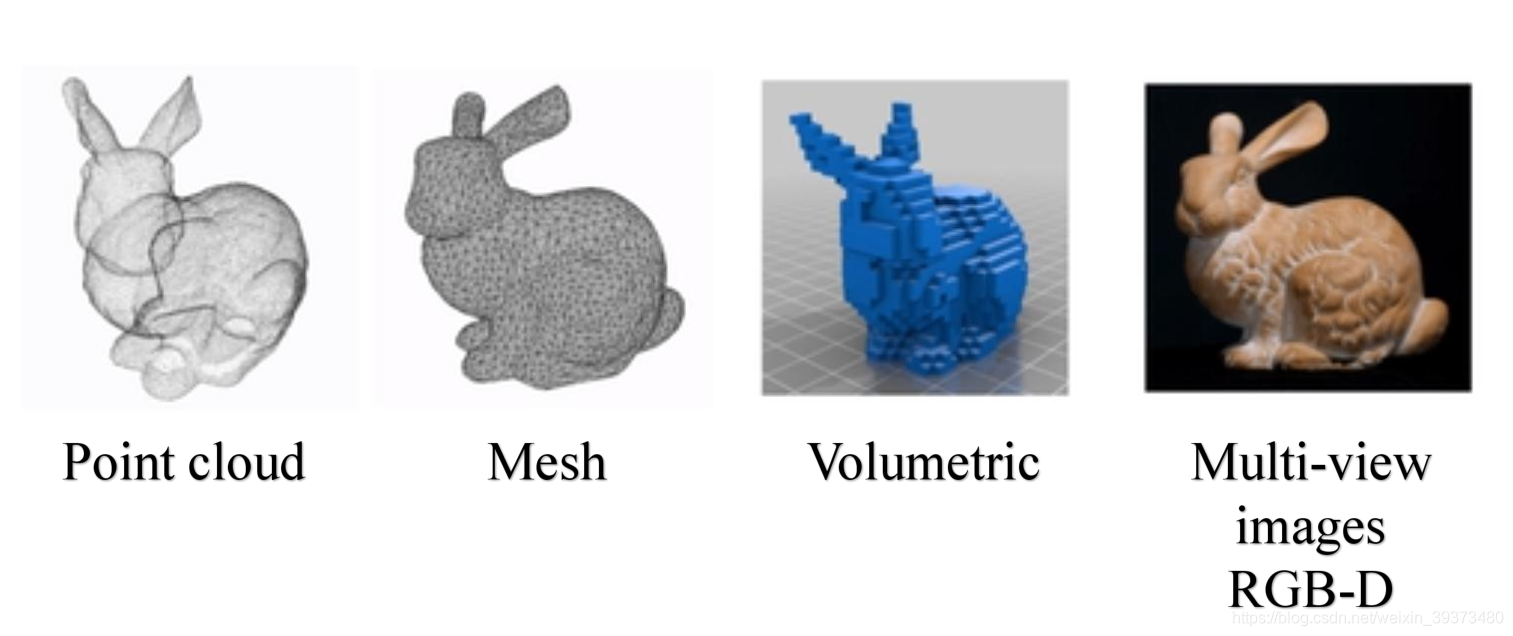 三维数据的表述形式一般分为四种: 三维数据的表述形式一般分为四种:
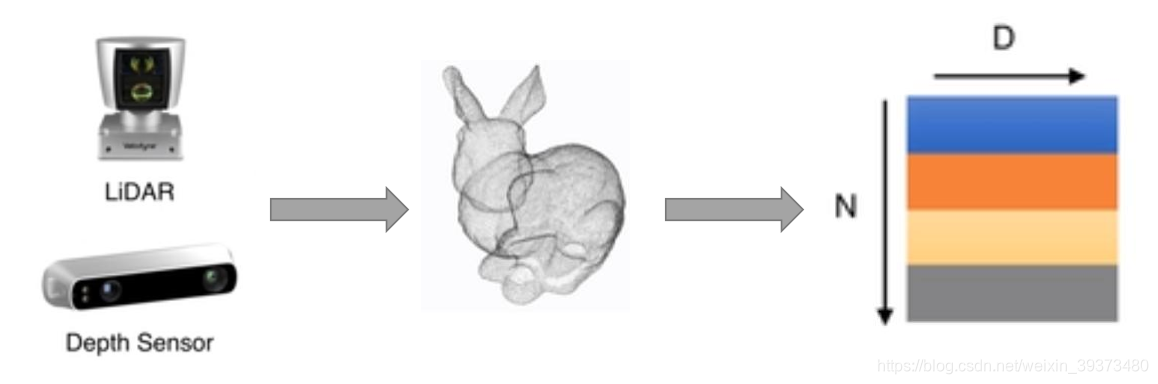
- 点云:由N NN个D DD维的点组成,当这个D = 3 D=3D=3的时候一般代表着( x , y , z ) (x,y,z)(x,y,z)的坐标,当然也可以包括一些法向量、强度等别的特征。这是今天主要讲述的数据类型。
- Mesh:由三角面片和正方形面片组成。
- 体素:由三维栅格将物体用0和1表征。
- 多角度的RGB图像或者RGB-D图像
1.2 为什么使用点云
点云由很多优势,也越来越受到雷达自动驾驶的青睐。
- 点云更接近于设备的原始表征(即雷达扫描物体直接产生点云)
- 点云的表达方式更加简单,一个物体仅用一个N × D N \times DN×D的矩阵表示
1.3 点云上以往的相关工作
在PointNet出现以前,点云上的深度学习模型大致分为三类(这里不细述):
- 基于3DCNN的体素模型:先将点云映射到体素空间上,在通过3DCNN进行分类或者分割。但是缺点是计算量受限制,目前最好的设备也大致只能处理32 × 32 × 32 32\times32\times3232×32×32的体素;另外由于体素网格的立方体性质,点云表面很多特征都没有办法被表述出来,因此模型效果差。
- 将点云映射到2D空间中利用CNN分类
- 利用传统的人工点云特征分类,例如:
- normal 法向量
- intensity 激光雷达的采样的时候一种特性强度信息的获取是激光扫描仪接受装置采集到的回波强度,此强度信息与目标 的表面材质、粗糙度、入射角方向,以及仪器的发射能量,激光波长有关
- local density 局部稠密度
- local curvature 局部曲率
- linearity, planarity and scattering propesed by Dimensionality based scale selection in 3D lidar point clouds
- verticality feature proposed by Weakly supervised segmentation-aided classification of urban scenes from 3d LiDAR point clouds
2. PointNet
要想设计好的网络,首先要根据点云的特性来实现特定的网络性能,而PointNet就是这么做的。点云具有两个非常重要的特性:
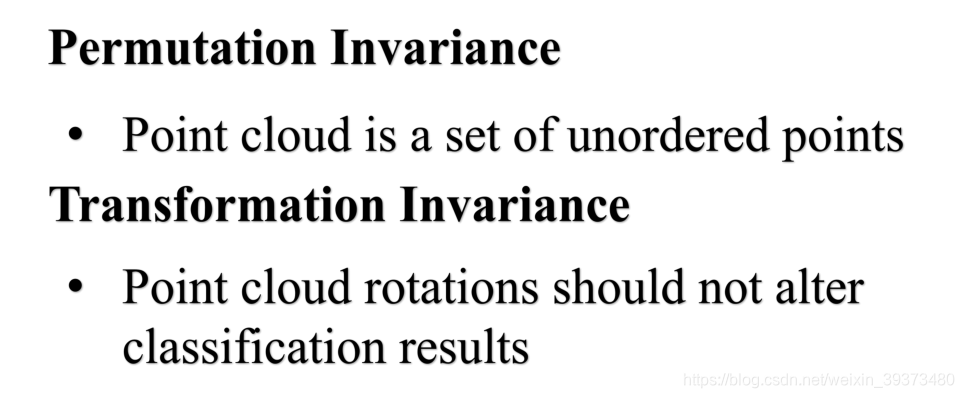
2.1 基于点云的置换不变性
2.1.1 由对称函数到PointNet(vanilla)
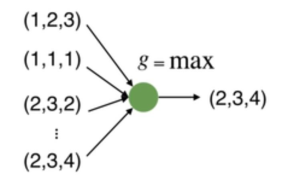
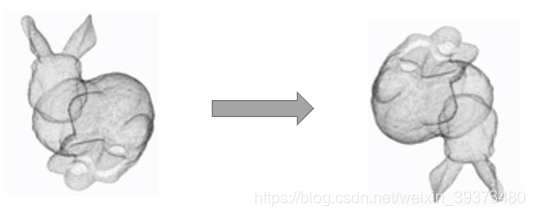
点云实际上拥有置换不变性的特点,那么什么是置换不变性呢,简单地说就是点的排序不影响物体的性质,如下图所示:
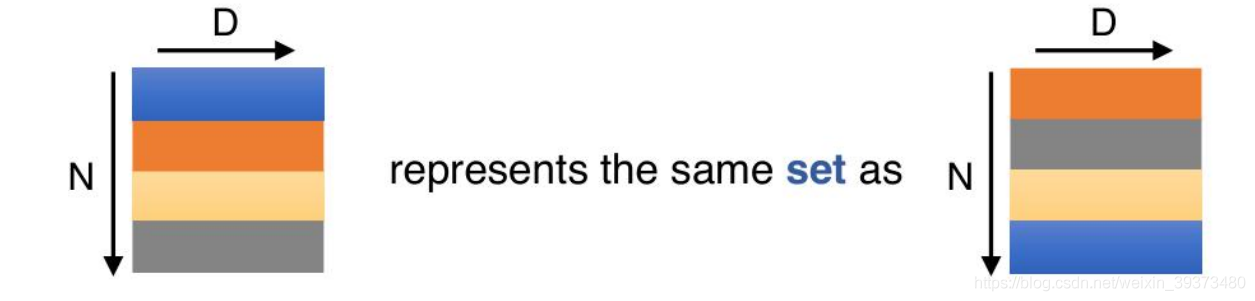
当一个N × D N \times DN×D在N NN的维度上随意的打乱之后,其表述的其实是同一个物体。因此针对点云的置换不变性,其设计的网络必须是一个对称的函数:

我们经常看到的SUM和MAX等函数其实都是对称函数。
因此我们可以利用max函数设计一个很简单的点云网络,如下:
但是这样的网络有一个问题,就是每个点损失的特征太多了,输出的全局特征仅仅继承了三个坐标轴上最大的那个特征,因此我们不妨先将点云上的每一个点映射到一个高维的空间(例如1024维),目的是使得再次做MAX操作,损失的信息不会那么多。
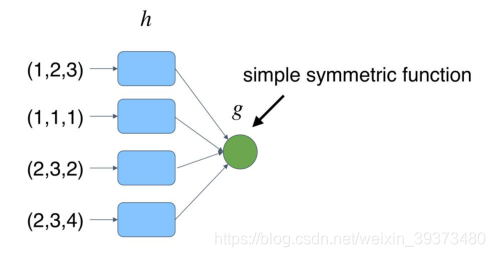
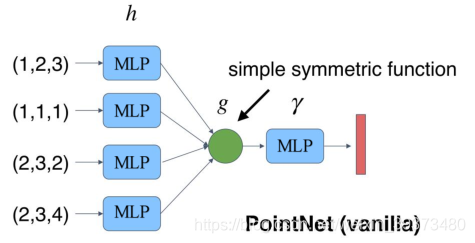
此时我们发现,当我们将点云的每个点先映射到一个冗余的高维空间后,再去进行max的对称函数操作,损失的特征就没那么多了。由此,就可以设计出这PointNet的雏形,称之为PointNet(vanilla):
2.1.2 理论证明
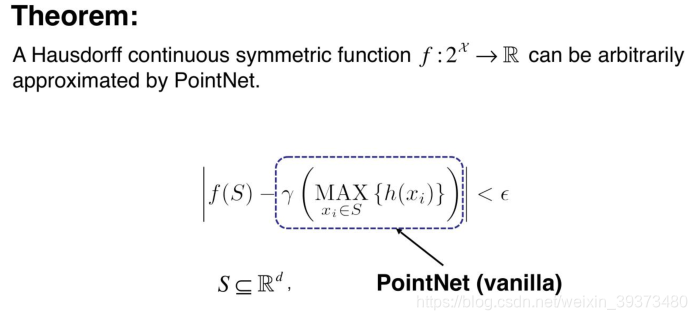
论文中其实有给出理论的证明,大致的意思是:任意一个在Hausdorff空间上连续的函数,都可以被这样的PointNet(vanilla)无限的逼近。
2.2 基于点云的旋转不变性
点云的旋转不变性指的是,给予一个点云一个旋转,所有的x , y , z x,y,zx,y,z坐标都变了,但是代表的还是同一个物体。
因此对于普通的PointNet(vanilla),如果先后输入同一个但是经过不同旋转角度的物体,它可能不能很好地将其识别出来。在论文中的方法是新引入了一个T-Net网络去学习点云的旋转,将物体校准,剩下来的PointNet(vanilla)只需要对校准后的物体进行分类或者分割即可。
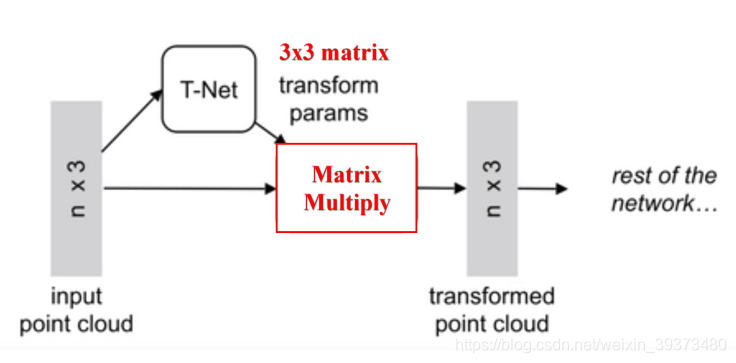
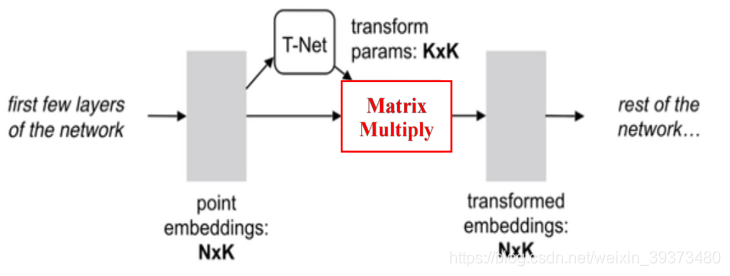
由图可以看出,由于点云的旋转非常的简单,只需要对一个N × D N\times DN×D的点云矩阵乘以一个D × D D \times DD×D的旋转矩阵即可,因此对输入点云学习一个3 × 3 3 \times 33×3的矩阵,即可将其矫正;同样的将点云映射到K维的冗余空间后,再对K维的点云特征做一次校对,只不过这次校对需要引入一个正则化惩罚项,希望其尽可能接近于一个正交矩阵。

2.3 网络总体结构
满足了以上两个点云的特性之后,就可以顺理成章的设计出PointNet的网络结构了。
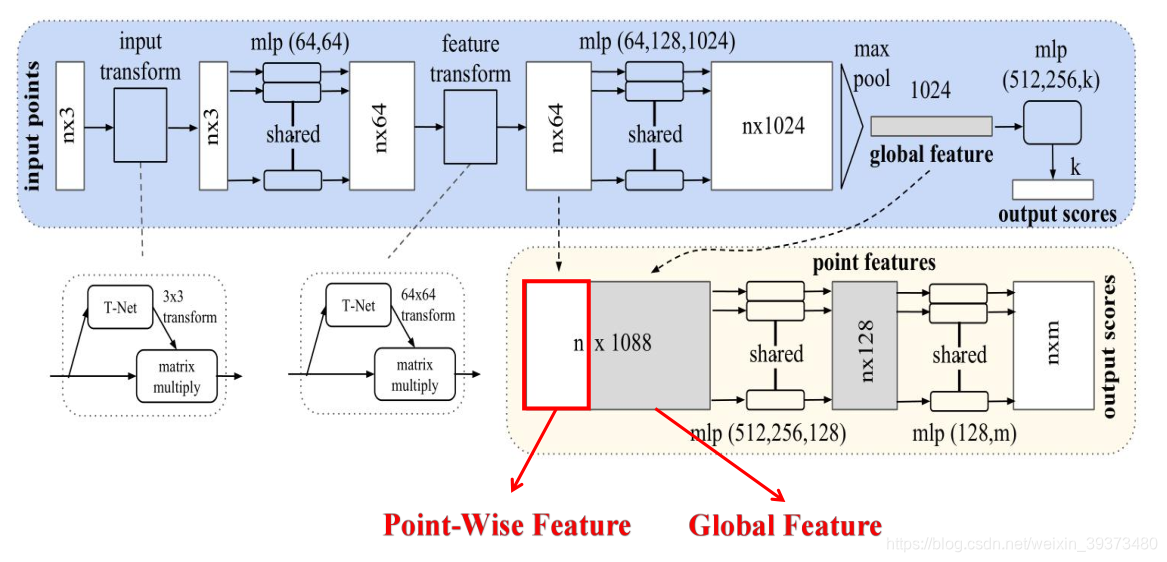
具体来说,对于每一个N × 3 N\times 3N×3的点云输入,网络先通过一个T-Net将其在空间上对齐(旋转到正面),再通过MLP将其映射到64维的空间上,再进行对齐,最后映射到1024维的空间上。这时对于每一个点,都有一个1024维的向量表征,而这样的向量表征对于一个3维的点云明显是冗余的,因此这个时候引入最大池化操作,将1024维所有通道上都只保留最大的那一个,这样得到的1 × 1024 1\times 10241×1024的向量就是N NN个点云的全局特征。
如果做的是分类的问题,直接将这个全局特征再进过MLP去输出每一类的概率即可;但如果是分割问题,由于需要输出的是逐点的类别,因此其将全局特征拼接在了点云64维的逐点特征上,最后通过MLP,输出逐点的分类概率。
2.4 实验结果和网络的鲁棒性
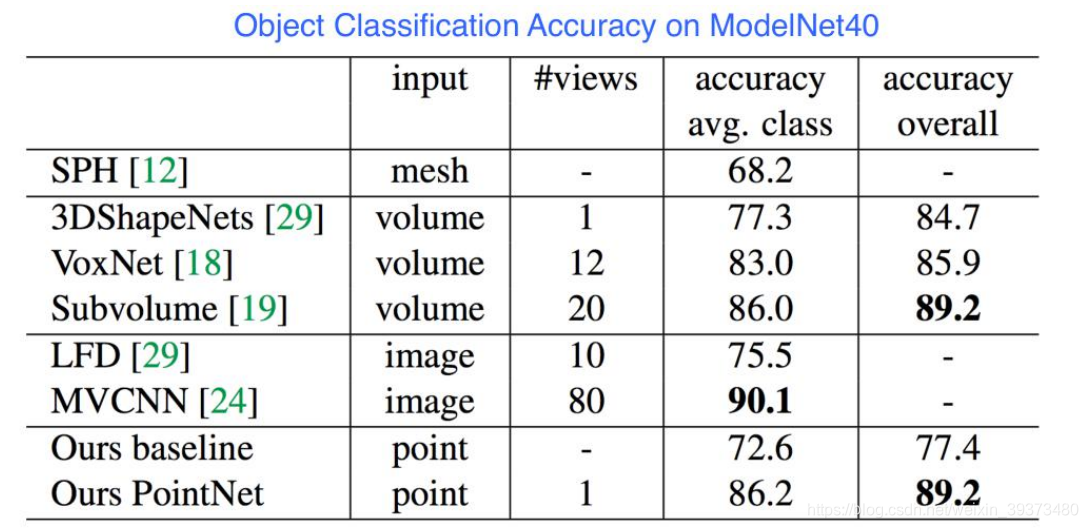
pointnet当时不论是分割还是分类的结果都超过了当时的体素系列网络,同时由于参数少等特点,训练快,属于轻量级网络。
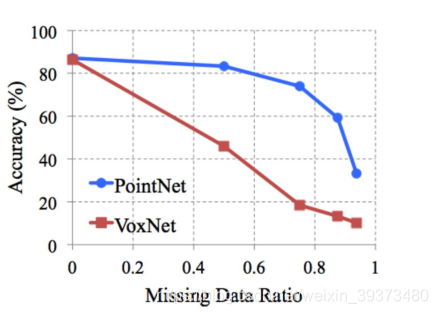
不仅如此,论文对PointNet对点云的点的缺失鲁棒性做了实验,实验证明,当PointNet缺失了60%左右的点的时候,其网络的效果都不怎么减少:
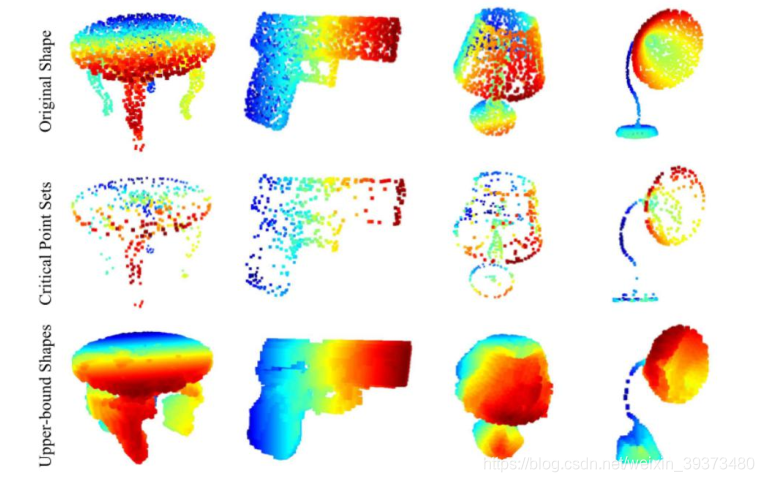
通过研究是哪些点最大程度激活了神经元的值,论文发现,能够最大程度激活网络的点都是物体的主干点(下图第二行),将其上采样,很容易能得到原始的结构。因此这就是PointNet网络的缺失鲁棒性的来源。
2.5 代码解析
PointNet的代码实际上仅由两部分组成,就是T-Net和一个Encoder-Decoder结构:
先看T-Net的代码:
class T_Net(nn.Module):
    def __init__(self):
        super(T_Net, self).__init__()
        # 这里需要注意的是上文提到的MLP均由卷积结构完成
        # 比如说将3维映射到64维,其利用64个1x3的卷积核
        self.conv1 = torch.nn.Conv1d(3, 64, 1)
        self.conv2 = torch.nn.Conv1d(64, 128, 1)
        self.conv3 = torch.nn.Conv1d(128, 1024, 1)
        self.fc1 = nn.Linear(1024, 512)
        self.fc2 = nn.Linear(512, 256)
        self.fc3 = nn.Linear(256, 9)
        self.relu = nn.ReLU()

        self.bn1 = nn.BatchNorm1d(64)
        self.bn2 = nn.BatchNorm1d(128)
        self.bn3 = nn.BatchNorm1d(1024)
        self.bn4 = nn.BatchNorm1d(512)
        self.bn5 = nn.BatchNorm1d(256)


    def forward(self, x):
        batchsize = x.size()[0]
        x = F.relu(self.bn1(self.conv1(x)))
        x = F.relu(self.bn2(self.conv2(x)))
        x = F.relu(self.bn3(self.conv3(x)))
        x = torch.max(x, 2, keepdim=True)[0]
        x = x.view(-1, 1024)

        x = F.relu(self.bn4(self.fc1(x)))
        x = F.relu(self.bn5(self.fc2(x)))
        x = self.fc3(x)

        iden = Variable(torch.from_numpy(np.array([1,0,0,0,1,0,0,0,1]).astype(np.float32))).view(1,9).repeat(batchsize,1)
        if x.is_cuda:
            iden = iden.cuda()
        x = x + iden
        x = x.view(-1, 3, 3) # 输出为Batch*3*3的张量
        return x
再看PointNet的主体:
class PointNetEncoder(nn.Module):
    def __init__(self, global_feat = True):
        super(PointNetEncoder, self).__init__()
        self.stn = T_Net()
        self.conv1 = torch.nn.Conv1d(3, 64, 1)
        self.conv2 = torch.nn.Conv1d(64, 128, 1)
        self.conv3 = torch.nn.Conv1d(128, 1024, 1)
        self.bn1 = nn.BatchNorm1d(64)
        self.bn2 = nn.BatchNorm1d(128)
        self.bn3 = nn.BatchNorm1d(1024)
        self.global_feat = global_feat
    def forward(self, x):
   	    '''生成全局特征'''
        n_pts = x.size()[2]
        trans = self.stn(x)
        x = x.transpose(2,1)
        x = torch.bmm(x, trans) # batch matrix multiply 即乘以T-Net的结果
        x = x.transpose(2,1)
        x = self.conv1(x)

        x = F.relu(self.bn1(x))
        pointfeat = x
        x_skip = self.conv2(x)

        x = F.relu(self.bn2(x_skip))
        x = self.bn3(self.conv3(x))
        x = torch.max(x, 2, keepdim=True)[0]
        x = x.view(-1, 1024)
        if self.global_feat:
            return x, trans
        else:
            x = x.view(-1, 1024, 1).repeat(1, 1, n_pts)
            return torch.cat([x, pointfeat], 1), trans

class PointNetCls(nn.Module):
    def __init__(self, k = 2):
        super(PointNetCls, self).__init__()
        self.k = k
        self.feat = PointNetEncoder(global_feat=False)
        self.conv1 = torch.nn.Conv1d(1088, 512, 1)
        self.conv2 = torch.nn.Conv1d(512, 256, 1)
        self.conv3 = torch.nn.Conv1d(256, 128, 1)
        self.conv4 = torch.nn.Conv1d(128, self.k, 1)
        self.bn1 = nn.BatchNorm1d(512)
        self.bn2 = nn.BatchNorm1d(256)
        self.bn3 = nn.BatchNorm1d(128)

    def forward(self, x):
    	'''分类网络'''
        batchsize = x.size()[0]
        n_pts = x.size()[2]
        x, trans = self.feat(x)
        x = F.relu(self.bn1(self.conv1(x)))
        x = F.relu(self.bn2(self.conv2(x)))
        x = F.relu(self.bn3(self.conv3(x)))
        x = self.conv4(x)
        x = x.transpose(2,1).contiguous()
        x = F.log_softmax(x.view(-1,self.k), dim=-1)
        x = x.view(batchsize, n_pts, self.k)
        return x


class PointNetPartSeg(nn.Module):
    def __init__(self,num_class):
        super(PointNetPartSeg, self).__init__()
        self.k = num_class
        self.feat = PointNetEncoder(global_feat=False)
        self.conv1 = torch.nn.Conv1d(1088, 512, 1)
        self.conv2 = torch.nn.Conv1d(512, 256, 1)
        self.conv3 = torch.nn.Conv1d(256, 128, 1)
        self.conv4 = torch.nn.Conv1d(128, self.k, 1)
        self.bn1 = nn.BatchNorm1d(512)
        self.bn1_1 = nn.BatchNorm1d(1024)
        self.bn2 = nn.BatchNorm1d(256)
        self.bn3 = nn.BatchNorm1d(128)

    def forward(self, x):
        '''分割网络'''
        batchsize = x.size()[0]
        n_pts = x.size()[2]
        x, trans = self.feat(x)
        x = F.relu(self.bn1(self.conv1(x)))
        x = F.relu(self.bn2(self.conv2(x)))
        x = F.relu(self.bn3(self.conv3(x)))
        x = self.conv4(x)
        x = x.transpose(2,1).contiguous()
        x = F.log_softmax(x.view(-1,self.k), dim=-1)
        x = x.view(batchsize, n_pts, self.k)
        return x, trans
3. PointNet++
3.1 PointNet的缺点
PointNet++的提出源于PointNet的缺点——缺失局部特征。
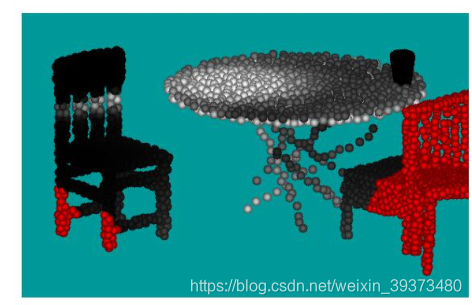
从很多实验结果都可以看出,PointNet对于场景的分割效果十分一般,由于其网络直接暴力地将所有的点最大池化为了一个全局特征,因此局部点与点之间的联系并没有被网络学习到。在分类和物体的Part Segmentation中,这样的问题还可以通过中心化物体的坐标轴部分地解决,但在场景分割中,这就导致效果十分一般了。
3.2 Multi-Scale PointNet
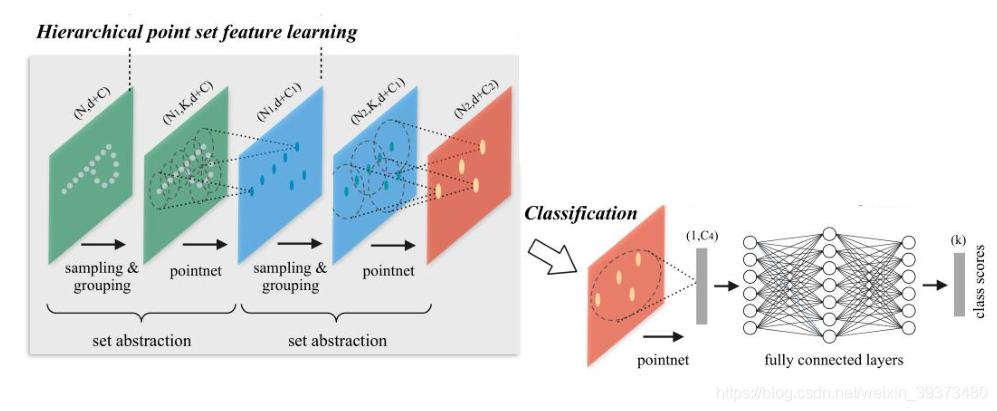
作者在第二代PointNet中主要借鉴了CNN的多层感受野的思想。CNN通过分层不断地使用卷积核扫描图像上的像素并做内积,使得越到后面的特征图感受野越大,同时每个像素包含的信息也越多。而PointNet++就是仿照了这样的结构,具体如下:
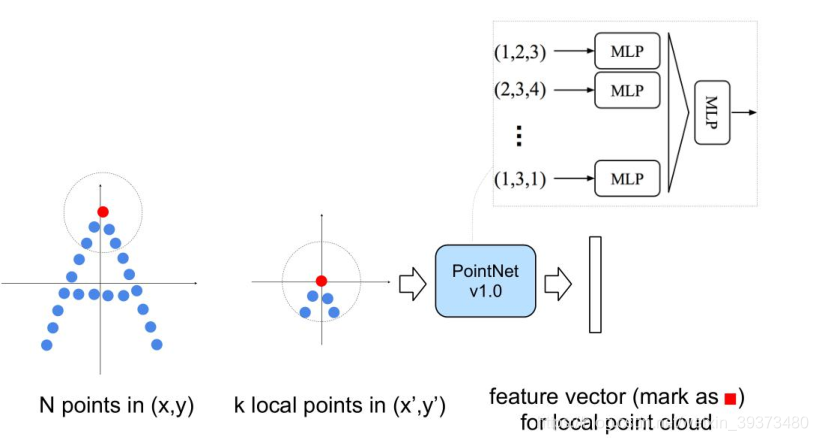
其先通过在整个点云的局部采样并划一个范围,将里面的点作为局部的特征,用PointNet进行一次特征的提取。因此,通过了多次这样的操作以后,原本的点的个数变得越来越少,而每个点都是有上一层更多的点通过PointNet提取出来的局部特征,也就是每个点包含的信息变多了。文章将这样的一个层成为Set Abstraction。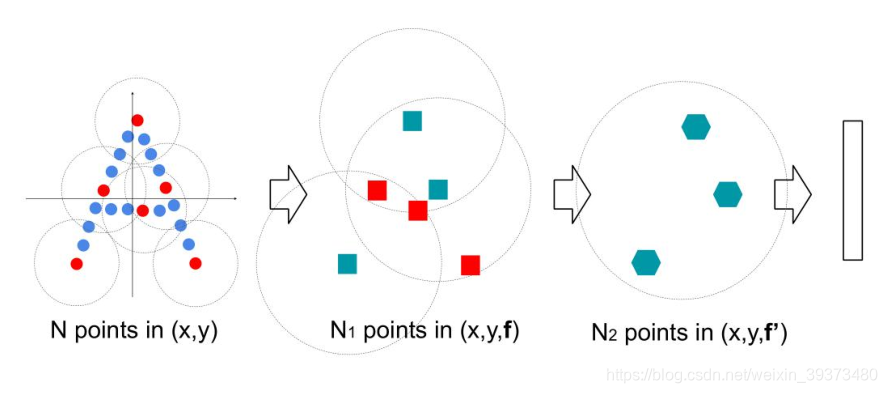
3.3 Set Abstraction的实现细节
一个Set Abstraction主要由三部分组成:
- Sampling:利用FPS(最远点采样)随机采样点
- Grouping:利用Ball Query划一个R为半径的圈,将每个圈里面的点云作为一簇
- PointNet: 对Sampling+Grouping以后的点云进行局部的全局特征提取
其中Sampling+Grouping的代码如下:(全部代码可以看文章开头的Github)
def farthest_point_sample(xyz, npoint):
    """
    Input:
        xyz: pointcloud data, [B, N, C]
        npoint: number of samples
    Return:
        centroids: sampled pointcloud data, [B, npoint, C]
    """
    device = xyz.device
    B, N, C = xyz.shape
    S = npoint
    centroids = torch.zeros(B, S, dtype=torch.long).to(device)
    distance = torch.ones(B, N).to(device) * 1e10
    farthest = torch.randint(0, N, (B,), dtype=torch.long).to(device)
    batch_indices = torch.arange(B, dtype=torch.long).to(device)
    for i in range(S):
        centroids[:, i] = farthest
        centroid = xyz[batch_indices, farthest, :].view(B, 1, 3)
        dist = torch.sum((xyz - centroid) ** 2, -1)
        mask = dist < distance
        distance[mask] = dist[mask]
        farthest = torch.max(distance, -1)[1]
    return centroids


def query_ball_point(radius, nsample, xyz, new_xyz):
    """
    Input:
        radius: local region radius
        nsample: max sample number in local region
        xyz: all points, [B, N, C]
        new_xyz: query points, [B, S, C]
    Return:
        group_idx: grouped points index, [B, S, nsample]
    """
    device = xyz.device
    B, N, C = xyz.shape
    _, S, _ = new_xyz.shape
    K = nsample
    group_idx = torch.arange(N, dtype=torch.long).to(device).view(1, 1, N).repeat([B, S, 1])
    sqrdists = square_distance(new_xyz, xyz)
    group_idx[sqrdists > radius ** 2] = N
    group_idx = group_idx.sort(dim=-1)[0][:, :, :K]
    group_first = group_idx[:, :, 0].view(B, S, 1).repeat([1, 1, K])
    mask = group_idx == N
    group_idx[mask] = group_first[mask]
    return group_idx


def sample_and_group(npoint, radius, nsample, xyz, points):
    """
    Input:
        npoint:
        radius:
        nsample:
        xyz: input points position data, [B, N, C]
        points: input points data, [B, N, D]
    Return:
        new_xyz: sampled points position data, [B, 1, C]
        new_points: sampled points data, [B, 1, N, C+D]
    """
    B, N, C = xyz.shape
    S = npoint

    new_xyz = index_points(xyz, farthest_point_sample(xyz, npoint))
    idx = query_ball_point(radius, nsample, xyz, new_xyz)
    grouped_xyz = index_points(xyz, idx)
    grouped_xyz -= new_xyz.view(B, S, 1, C)
    if points is not None:
        grouped_points = index_points(points, idx)
        new_points = torch.cat([grouped_xyz, grouped_points], dim=-1)
    else:
        new_points = grouped_xyz
    return new_xyz, new_points
3.4 分类网络
分类网络只要通过这样逐层的提取局部特征,最后总结出全局特征就可以输出分类结果了,如图:
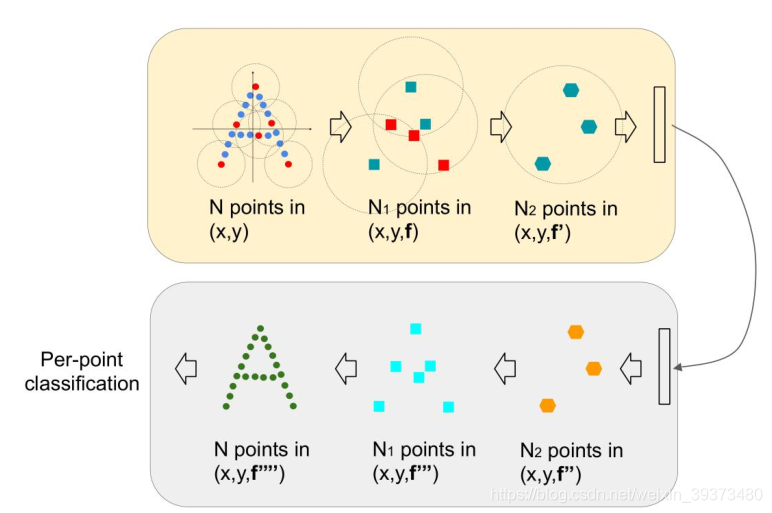
3.5 分割网络
分割网络相比而言较为复杂,其会先将点云提取一个全局的特征,再通过这个全局的特征逐步上采样,大致的流程如下:
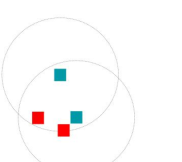
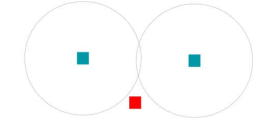
作者在论文中讨论了上采样的一些方法,当然最简单的就是简单的广播复制Broadcasting,即将每个点的附近的点的特征都变成和这个点一样,但是这样的方法会使得没有办法处理一些范围相冲突的点,或者范围没有覆盖到的点,如图:
因此在论文中作者采用的是线性差值的方法,具体的公式如下:
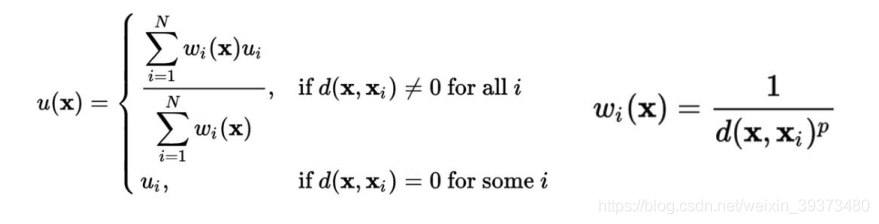
简单来说就是距离越远的点权重越小,最后对于每一个点的权重再做一个全局的归一化。最后分割网络的结构长成这个样子:
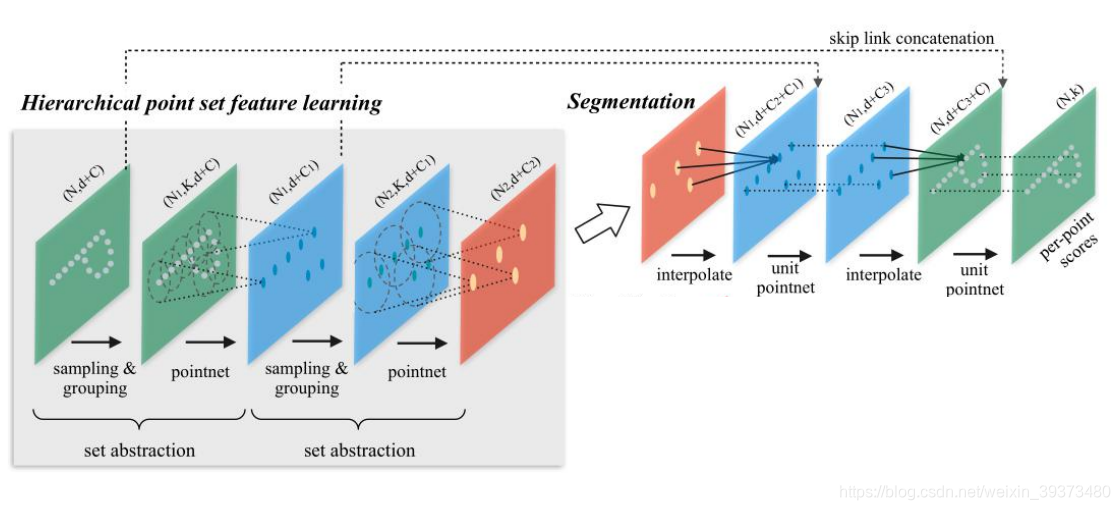
需要注意的是,与图像分割网络U-Net类似,对于相同的点个数的层,作者采用了直连的方式将Encoder里面的特征拼接到了Decoder的特征后。
3.6 原始方法的不足及改进
通过上述方法实现的PointNet++虽然在点云上的分类和分割效果有了一定的提升,但是作者发现,其在点云的缺失鲁邦性上似乎变得更差了。其原因是因为激光收集点云的时候总是在近的地方密集,在远的地方稀疏,因此当Sampling和Grouping的操作在稀疏的地方进行的时候,一个点可能代表了很多很多的局部特征,因此一旦缺失,网络的性能就会极大的受影响(如下图左)。
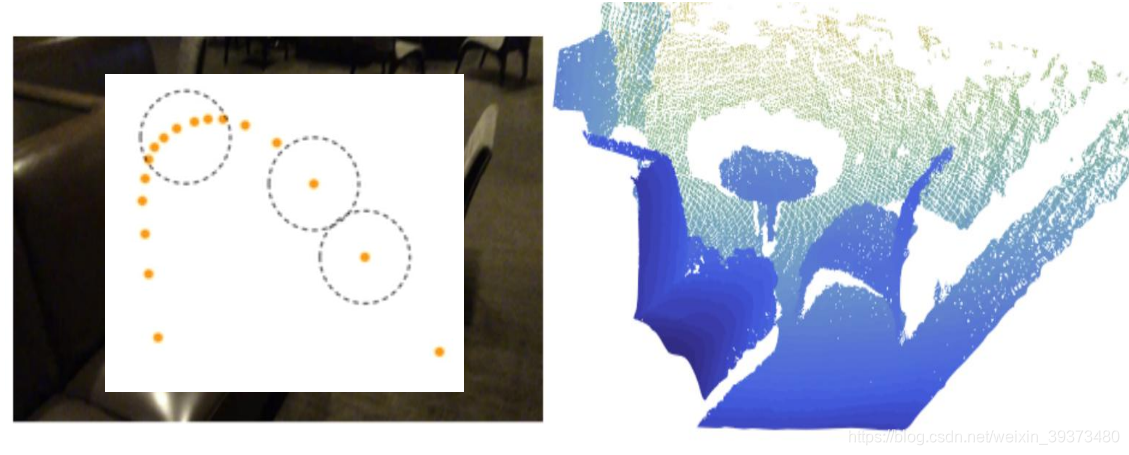
从这张图可以看出,当点云的个数缺失到20%的时候,PointNet++的性能甚至还不如PointNet。

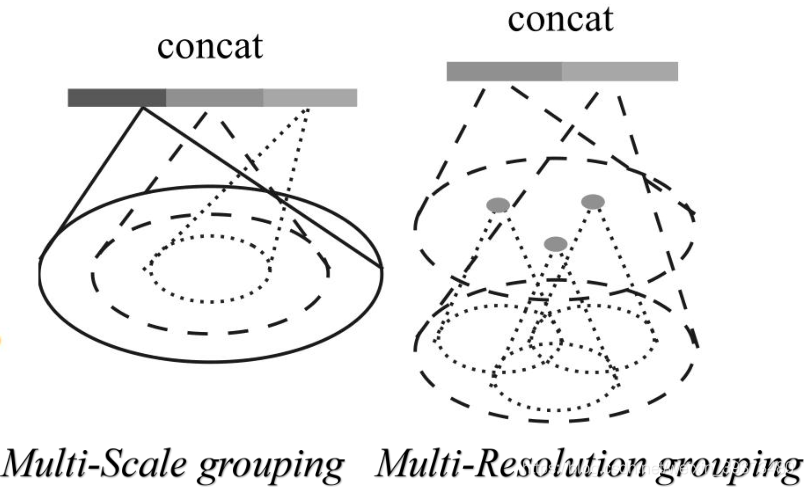
作者对其的改进是通过引入了不同分辨率/尺度的Grouping去对局部做PointNet求局部的全局特征,最后再将不同尺度的特征拼接起来;同时也通过在训练的时候随机删除一部分的点来增加模型的缺失鲁棒性。
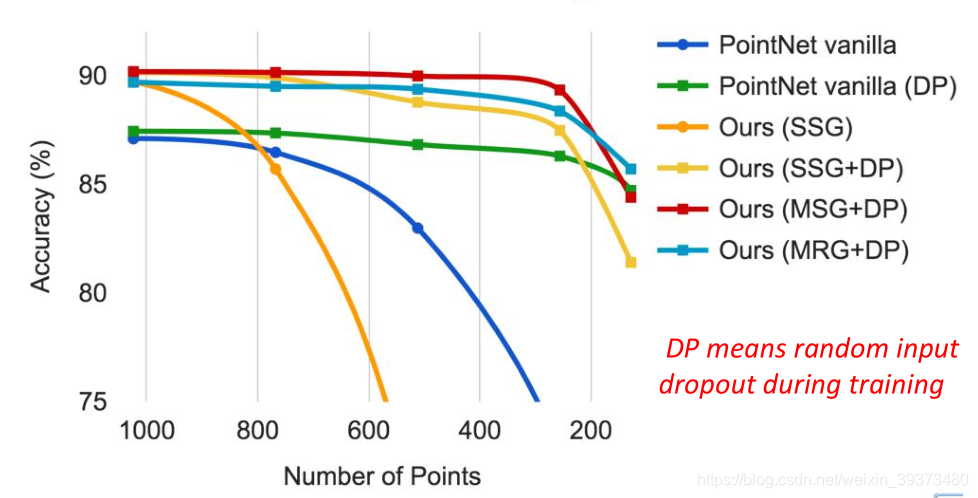
最终结果如下,可以发现新的PointNet++在点缺失到80%左右都具有良好的表现:
3.7 代码解析
PointNet++的代码结构也比较规整,其难点主要在SA层和FP层的构建上,先来看总体的框架(以分割网络为例):
class PointNet2PartSeg(nn.Module):
    def __init__(self, num_classes):
        super(PointNet2PartSeg, self).__init__()
        self.sa1 = PointNetSetAbstraction(npoint=512, radius=0.2, nsample=64, in_channel=3, mlp=[64, 64, 128], group_all=False)
        self.sa2 = PointNetSetAbstraction(npoint=128, radius=0.4, nsample=64, in_channel=128 + 3, mlp=[128, 128, 256], group_all=False)
        self.sa3 = PointNetSetAbstraction(npoint=None, radius=None, nsample=None, in_channel=256 + 3, mlp=[256, 512, 1024], group_all=True)
        self.fp3 = PointNetFeaturePropagation(in_channel=1280, mlp=[256, 256])
        self.fp2 = PointNetFeaturePropagation(in_channel=384, mlp=[256, 128])
        self.fp1 = PointNetFeaturePropagation(in_channel=128, mlp=[128, 128, 128])
        self.conv1 = nn.Conv1d(128, 128, 1)
        self.bn1 = nn.BatchNorm1d(128)
        self.drop1 = nn.Dropout(0.5)
        self.conv2 = nn.Conv1d(128, num_classes, 1)

    def forward(self, xyz):
        # Set Abstraction layers
        l1_xyz, l1_points = self.sa1(xyz, None)
        l2_xyz, l2_points = self.sa2(l1_xyz, l1_points)
        l3_xyz, l3_points = self.sa3(l2_xyz, l2_points)
        # Feature Propagation layers
        l2_points = self.fp3(l2_xyz, l3_xyz, l2_points, l3_points)
        l1_points = self.fp2(l1_xyz, l2_xyz, l1_points, l2_points)
        l0_points = self.fp1(xyz, l1_xyz, None, l1_points)
        # FC layers
        feat =  F.relu(self.bn1(self.conv1(l0_points)))
        x = self.drop1(feat)
        x = self.conv2(x)
        x = F.log_softmax(x, dim=1)
        x = x.permute(0, 2, 1)
        return x, feat
- 1
- 2
- 3
- 4
- 5
- 6
- 7
- 8
- 9
- 10
- 11
- 12
- 13
- 14
- 15
- 16
- 17
- 18
- 19
- 20
- 21
- 22
- 23
- 24
- 25
- 26
- 27
- 28
- 29
- 30
其Set Abstraction层的代码:
class PointNetSetAbstraction(nn.Module):
    def __init__(self, npoint, radius, nsample, in_channel, mlp, group_all):
        super(PointNetSetAbstraction, self).__init__()
        self.npoint = npoint
        self.radius = radius
        self.nsample = nsample
        self.mlp_convs = nn.ModuleList()
        self.mlp_bns = nn.ModuleList()
        last_channel = in_channel
        for out_channel in mlp:
            self.mlp_convs.append(nn.Conv2d(last_channel, out_channel, 1))
            self.mlp_bns.append(nn.BatchNorm2d(out_channel))
            last_channel = out_channel
        self.group_all = group_all

    def forward(self, xyz, points):
        """
        Input:
            xyz: input points position data, [B, C, N]
            points: input points data, [B, D, N]
        Return:
            new_xyz: sampled points position data, [B, C, S]
            new_points_concat: sample points feature data, [B, D', S]
        """
        xyz = xyz.permute(0, 2, 1)
        if points is not None:
            points = points.permute(0, 2, 1)

        if self.group_all:
            new_xyz, new_points = sample_and_group_all(xyz, points)
        else:
            new_xyz, new_points = sample_and_group(self.npoint, self.radius, self.nsample, xyz, points)

        new_points = new_points.permute(0, 3, 2, 1)
        for i, conv in enumerate(self.mlp_convs):
            bn = self.mlp_bns[i]
            new_points =  F.relu(bn(conv(new_points)))

        new_points = torch.max(new_points, 2)[0]
        new_xyz = new_xyz.permute(0, 2, 1)
        return new_xyz, new_points
- 1
- 2
- 3
- 4
- 5
- 6
- 7
- 8
- 9
- 10
- 11
- 12
- 13
- 14
- 15
- 16
- 17
- 18
- 19
- 20
- 21
- 22
- 23
- 24
- 25
- 26
- 27
- 28
- 29
- 30
- 31
- 32
- 33
- 34
- 35
- 36
- 37
- 38
- 39
- 40
- 41
- 42
其Feature Propagation层的代码:
class PointNetFeaturePropagation(nn.Module):
    def __init__(self, in_channel, mlp):
        super(PointNetFeaturePropagation, self).__init__()
        self.mlp_convs = nn.ModuleList()
        self.mlp_bns = nn.ModuleList()
        last_channel = in_channel
        for out_channel in mlp:
            self.mlp_convs.append(nn.Conv1d(last_channel, out_channel, 1))
            self.mlp_bns.append(nn.BatchNorm1d(out_channel))
            last_channel = out_channel

    def forward(self, xyz1, xyz2, points1, points2):
        """
        Input:
            xyz1: input points position data, [B, C, N]
            xyz2: sampled input points position data, [B, C, S]
            points1: input points data, [B, D, N]
            points2: input points data, [B, D, S]
        Return:
            new_points: upsampled points data, [B, D', N]
        """
        xyz1 = xyz1.permute(0, 2, 1)
        xyz2 = xyz2.permute(0, 2, 1)

        points2 = points2.permute(0, 2, 1)
        B, N, C = xyz1.shape
        _, S, _ = xyz2.shape

        if S == 1:
            interpolated_points = points2.repeat(1, N, 1)
        else:
            dists = square_distance(xyz1, xyz2)
            dists, idx = dists.sort(dim=-1)
            dists, idx = dists[:, :, :3], idx[:, :, :3]  # [B, N, 3]
            dists[dists < 1e-10] = 1e-10
            weight = 1.0 / dists  # [B, N, 3]
            weight = weight / torch.sum(weight, dim=-1).view(B, N, 1)  # [B, N, 3]
            interpolated_points = torch.sum(index_points(points2, idx) * weight.view(B, N, 3, 1), dim=2)

        if points1 is not None:
            points1 = points1.permute(0, 2, 1)
            new_points = torch.cat([points1, interpolated_points], dim=-1)
        else:
            new_points = interpolated_points

        new_points = new_points.permute(0, 2, 1)
        for i, conv in enumerate(self.mlp_convs):
            bn = self.mlp_bns[i]
            new_points =  F.relu(bn(conv(new_points)))
        return new_points
- 1
- 2
- 3
- 4
- 5
- 6
- 7
- 8
- 9
- 10
- 11
- 12
- 13
- 14
- 15
- 16
- 17
- 18
- 19
- 20
- 21
- 22
- 23
- 24
- 25
- 26
- 27
- 28
- 29
- 30
- 31
- 32
- 33
- 34
- 35
- 36
- 37
- 38
- 39
- 40
- 41
- 42
- 43
- 44
- 45
- 46
- 47
- 48
- 49
- 50
4.总结
最后小小的总结一下,PointNet系列基本是近两年来所有点云分割网络的baseline,大部分state-of-art的网络也是通过以这两个网络为基础构造出来的。其优点非常的明显,就是参数量小;但其缺点就是对于局部的特征的抓取还不是特别的完善,这也是未来可以改进的地方。如果有想法的朋友欢迎交流!
返回列表
IoU、GIoU、DIoU、CIoU损失函数介绍 |