这篇教程搭建图像搜索引擎(之0):霍比特人&直方图写得很实用,希望能帮到您。
翻译自:
Hobbits and Histograms – A How-To Guide to Building Your First Image Search Engine in Pythonhttp://www.pyimagesearch.com/2014/01/27/hobbits-and-histograms-a-how-to-guide-to-building-your-first-image-search-engine-in-python/
我们将要搭建的这个图像搜索引擎看上去令人生畏,它有可能破坏了“至尊魔戒”,而没有“对末日火山”的大火带来任何帮助。当然,本人已经多次观赏了“The Hobbit and the Lord of the Rings”,并不断告诉自己,是什么令人生畏呢?其实也只是用影片里的截图而已。
以下是快速概览:
我们的目标:使用影片“Hobbit and Lord of the Rings”,的截图从头到尾搭建图片搜索引擎。
你将从中学到什么:包括代码示例在内的4个搭建图像搜索引擎的必须步骤。从这些例程当中,你将能按自己的想法搭建图片搜索引擎。
你需要准备什么:Python,NumPy和OpenCV。一些图像基本概念,比如:像素、直方图。不过这些不是必备,因为,本文将手把手指导你完成图片搜索引起的搭建。
我还没见过有关“如何搭建图片搜索引擎”的简单指南,当然这也是这篇博文的意义所在。我们将使用最基本的图像描述子——直方图,来量化和描述这些截图。
在之前的文章中提到过颜色直方图,如果你没读过也没关系,但我建议你如果实在不能很好理解本文那最好回头去读读那文章。在进入搭建图像搜索引擎之前,让我们看看数据集——“Hobbit and Lord of the Rings”的截图。

图1 数据集总共有25张,分为5类,包括了Dol Guldur, Goblin Town, Mordor(Black Gate), Rivendell和Shire
如图所示,这25张图像被分为5类,每类又包含以下场景:
- Dol Guldur:死灵法师的地牢, Sauron在Mirkwood的大本营
- Goblin Town: 迷雾山脉的兽人城镇, 妖精王的家.
- Mordor/The Black Gate: Sauron的堡垒及环绕的山脉和火山脊平原.
- Rivendell: 中土世界的精灵部落.
- The Shire:霍比特人的乡土.
以上图片选自“ The Hobbit: An Unexpected Journey”,“ The Lord of the Rings”,“The Return of the King.”。
目标:
首先我们要对数据集里的25张图像建立索引。这里,我们通过用图像描述子抽取每幅图像的特征来量化图像数据集,然后形成索引,并将形抽取的特征保存以备后用,比如运行搜索引擎。
一个图像描述子决定了量化的质量,因此,抽取图像特征也就称为描述图像。一个图像描述子的输出就是一个特征向量也就是对图像本身的提取。简而言之,就是用一列数字来代表一幅图像。两个向量可以通过距离度量来比较。向量的距离也就描述了图像的相似程度。至于图片搜索引起,我们给出一个查询图片的描述,并让根据与查询图片的相似度在索引中建立一个排序。
考虑一下下面这种方式:当你在Google输入“Lord of the Rings”,你希望Google返回与Tolkien的书以及这部影片相关的图片。类似的,如果我们用图片搜索引擎查询图片,我们希望返回的是内容相关的图片——因此,我们有时候把图片搜索引擎称为学术圈更常见的基于内容的图像检索(CBIR)系统。
说了这么多,那么这个图片搜索引擎的目标到底是什么呢?
目标就是,当给定一幅这5类的查询图片的时候,返回最相似的10个图像的类(真是无语)。下面我们用例子来探清这个搜索引擎。
如果我提交一幅关于Shire的图像给我们的系统,我将希望他给出的是数据集里10个结果中的5个Shire图片。同样的,当我提交一幅关于Rivendell的图像给我们的系统,我将希望他给出的是数据集里10个结果中的5个Rivendell图片。
这意义在哪?我们从下面4个搭建图片搜索引擎步骤说起。
搭建图片搜索引擎的4个步骤:
1 定义图像描述子:你将使用什么图像描述子来描述颜色,纹理,形状?
2 建立数据集索引:用你的描述子表示数据集,抽取每幅图像的特征。
3 定义相似度:你如何定义两幅图像相似与否?你可能会使用一些形似的相似度量,例如常见的欧氏距离,曼哈顿距离,余弦距离,卡方距离等。
4 搜索:开始搜索的时候,你要用描述子抽取图像,根据你的距离度量来排列与查询图像相似的图像。通过相似度对结果进行排序,然后检测。
Step1:描述子——一个三维的RGB颜色直方图
我们的描述子是一个三维的RGB彩色空间直方图,红绿蓝通道都是8个bin表示。解释一个三维直方图最好的方式是连接“与”(AND)。描述子将会查询一幅给定的图像有多少红色像素落入第一个bin 并且有多少绿色像素落入第二个bin 并且 有多少蓝色像素落入第一个bin。这个过程在每个bin的连接中会一直重复, 这将会在计算机里高效运行。
计算一个8bin的三维直方图时,OpencV是用类似一个(8,8,8)的(三维)数组来存储特征向量。我们对它进行简单的扩充重塑到(512,)一旦扩充完,特征之间的比较就容易多了。
迫不及待看看代码:
-
-
-
-
-
-
def __init__(self, bins):
-
-
-
-
def describe(self, image):
-
-
-
-
-
hist = cv2.calcHist([image], [0, 1, 2],
-
None, self.bins, [0, 256, 0, 256, 0, 256])
-
hist = cv2.normalize(hist)
-
-
-
正如代码所示,我已经定义了一个RGBHistogram类,我个人更倾向于用类来定义图像描述子而不是函数。因为我们很少单独对一幅图像进行提取特征,而是从数据集中批量提取。此外,我们希望从所有图像 提取的特征 用相同的参数——这样一来就有相同个数的bin。如果一幅图像用32个bin表示另外一幅却用128个bin来表示, 你用用它们来 比较相似性那没什么意义。
代码过程详解:
Lines 6-8: 定义RGBHistogram结构体。唯一的参数就是直方图中每个通道bin的个数。再次说明,这就是为什么我更喜欢用类而不是用函数来实现描述子——通过输入结构体中的相关参数,你能确保图像能使用这些相同的参数。
line 10;猜猜看。定义这种描述方法; 该方法能将一幅图像返回一个特征向量。
line 15:实际提取的三维RGB直方图(实际上是BGR,因为OpenCV是按照NumPy数组存储图像的,也就是通道顺序的调换)。我们假设self.bin是三个整数的列表,指定了每个通道的bin的个数。
line 16:根据像素计数来标准化直方图十分重要。假如我们使用一幅图像的原始(整数)的像素计数,然后缩进50%,再次进行描述,那么对于同一幅图就有两个特征向量,所以要避免这种情形。我们通过将原始整数计数转换到实数百分比来获取图像尺度不变性。例如,我们会用第一个bin占了20%的像素而不是第一个bin有120个像素。再次说明,通过使用像素计数的百分比,可以让两幅只有在尺寸上有差别的图像具有相同的特征向量。
line 20:计数三维直方图时,直方图用类似(N,N,N)bin的方式来表示。为了更容易计算直方图的距离,我们将三维数组扩展为(N*N*N,)的一维数组。例如,当我们实例化RGBHistoram的时候,每个通道8个bin。没有扩展的话,那么直方图的形似是(8,8,8)的数组。通过扩展直方图,形如(512,)的数组就方便多了。
Step 2:索引数据集
现在我们已经用三维直方图作为图像描述子,下一步就是将这个图像描述子应用于数据集之中。这就意味着我们要去循环遍历这25张图像数据,从每幅图像中提取三维直方图,然后存为字典,写到文件中。实际上,可按你所需建立简单或者复杂的索引。索引是一种很容易并行运行的任务。如果我们有四核的机器,可以通过分配四个核的工作提高索引过程速度。但是我们只有25个图像,那样做有点愚蠢,尤其考虑到计算直方图的速度。
见代码:
-
-
from pyimagesearch.rgbhistogram import RGBHistogram
-
-
-
-
-
-
-
ap = argparse.ArgumentParser()
-
ap.add_argument("-d", "--dataset", required = True,
-
help = "Path to the directory that contains the images to be indexed")
-
ap.add_argument("-i", "--index", required = True,
-
help = "Path to where the computed index will be stored")
-
args = vars(ap.parse_args())
-
-
-
-
-
首先,导入我们所需要的包。我已经决定将RGBHistoram类存放在 pyimagesearch的一个模块当中。这里用cPickle将数据转储到磁盘。用glob函数获取将要索引的图像路径。"--dataset"参数就是图像数据的路径,“--index”选项是计算后索引存放的路径。最后,用Python字典内置的类型初始化索引。字典的关键字就是图像文件名,并假设所有的文件名唯一,事实上也是如此。字典的值就是计算出图像的直方图。
使用字典对于本例来说具有很大的意义,特别是对于解释目的。给定一个键值,字典就指向一些目标。当用文件名作为键,直方图作为值,那就意味着对于一个给定的直方图H是用来量化和表示文件名为K的图像。更复杂的描述子用词频—反文档频率(TF-IDF)加权和反向索引,但我们要避免这些。不过别担心,我将带来更多的博文讨论如何使用更复杂的技术,但作为入门,从简单开始。
-
-
-
desc = RGBHistogram([8, 8, 8])
这里我们实例化了 RGBHistogram。再次说明,每个红绿蓝通道8个bin。
-
-
for imagePath in glob.glob(args["dataset"] + "/*.png"):
-
-
k = imagePath[imagePath.rfind("/") + 1:]
-
-
-
-
image = cv2.imread(imagePath)
-
features = desc.describe(image)
-
这是实际的索引,我们分析下:
line 2:用glob抓取图像路径,开始循环数据集。
line 4:提取字典键值。样本数据集文件名唯一,所以文件名本身足以成为键值。
line 8-10:从磁盘加载图像,然后用RGBHistogram提取直方图,将直方图存储在索引。
-
-
-
f = open(args["index"], "w")
-
f.write(cPickle.dumps(index))
-
至此,我们已经建立好了索引,就将它写入磁盘以便之后的搜索之用。
step 3:搜索
已经在磁盘上建立了索引,那就准备进行搜索吧。
程序里需要一些代码来实现实际搜索。那么,应该如何比较两个特征向量?如何确定它们的相似度呢?且见以下代码:
-
-
-
-
-
def __init__(self, index):
-
-
-
-
def search(self, queryFeatures):
-
-
-
-
-
for (k, features) in self.index.items():
-
-
-
-
-
d = self.chi2_distance(features, queryFeatures)
-
-
-
-
-
-
-
-
-
-
-
results = sorted([(v, k) for (k, v) in results.items()])
-
-
-
-
-
def chi2_distance(self, histA, histB, eps = 1e-10):
-
-
d = 0.5 * np.sum([((a - b) ** 2) / (a + b + eps)
-
for (a, b) in zip(histA, histB)])
-
-
-
首先,这里的代码注释居多,不必在意有41行之多,如你所料,我就是喜欢带多点注释的代码,我们来一窥究竟。
line 4-7:我所做的第一件事就是定义一个搜索器类和一个只有一个参数的索引结构体。该索引是设定为我们在建立索引时写入到文件的那个索引字典。
line 11:这里定义一个字典来存储结果。键就是图像文件名(索引里),值就是查询图像和给定图像的相似度。
line 14-26:这是实际搜索代码段。我们遍历索引中的所有图像文件名和对应的特征。用卡方距离来比较颜色直方图,并把计算的距离存储在字典中,也表示了两个图像之间的相似程度。
line 30-33:将结果按照相关性排序(卡方距离越小,相关性/相似性越大)并返回。
line 35-41:这段代码定义了比较两个直方图的卡方距离函数。通常,用大的bin和小的bin的区别并不重要,应该要用加权来表示,卡方距离的作用就在于此。同时,用一个虚值epsilon来避免讨厌的除以0带来的错误。如果特征向量的卡方距离为零,那么两幅图像就被认为是一模一样的。得到的距离越大,相似程度越小。
现在你明白了吧,一个Python类,就可以建立索引和执行搜索。接下来就是让搜索器工作了。
注意:对于那些更倾向于学术的朋友,你对直方图距离度量感兴趣,可能会想看ECCV2010会议上的:The Quadratic-Chi Histogram Distance Family。
Step 4:执行搜索
最后,我们正接近于完成一个功能性的图像搜索引擎。但是还不够,还需要一些额外的代码来处理图像的载入和执行搜索。
-
-
from pyimagesearch.searcher import Searcher
-
-
-
-
-
-
-
ap = argparse.ArgumentParser()
-
ap.add_argument("-d", "--dataset", required = True,
-
help = "Path to the directory that contains the images we just indexed")
-
ap.add_argument("-i", "--index", required = True,
-
help = "Path to where we stored our index")
-
args = vars(ap.parse_args())
-
-
-
index = cPickle.loads(open(args["index"]).read())
-
searcher = Searcher(index)
重要的事先来:导入所需要的包。可以看到,我已经把搜索器类存储在pyimagesearch模块里。然后按照之前建立索引步骤里的方式定义变量。最后,用cPickle来载入索引并初始化搜索器。
-
-
-
for (query, queryFeatures) in index.items():
-
-
results = searcher.search(queryFeatures)
-
-
-
path = args["dataset"] + "/%s" % (query)
-
queryImage = cv2.imread(path)
-
cv2.imshow("Query", queryImage)
-
print "query: %s" % (query)
-
-
-
-
-
-
montageA = np.zeros((166 * 5, 400, 3), dtype = "uint8")
-
montageB = np.zeros((166 * 5, 400, 3), dtype = "uint8")
-
-
-
-
-
-
(score, imageName) = results[j]
-
path = args["dataset"] + "/%s" % (imageName)
-
result = cv2.imread(path)
-
print "\t%d. %s : %.3f" % (j + 1, imageName, score)
-
-
-
-
montageA[j * 166:(j + 1) * 166, :] = result
-
-
-
-
montageB[(j - 5) * 166:((j - 5) + 1) * 166, :] = result
-
-
-
cv2.imshow("Results 1-5", montageA)
-
cv2.imshow("Results 6-10", montageB)
-
大部分的代码处理显示结果,实际的搜索动作在第31行。不管怎么样,看看再说:
line 3:这里将索引的每张图片当作查询图像,看看会得到什么结果。正常情况下,查询图像是外部图像而不是数据集的一部分,在此之前,先看看一些示例搜索结果。
line 5:这是实际搜索执行部分,将当前图像作为查询图像然后执行搜索。
line 8-11:载入并显示查询图像。
line 17-35:为了显示最优的10个结果,使用两个混拼图像。第一个显示结果1-5,第二个显示6-10。图像名和距离在第27行。
line 38-40:最后,像用户显示搜索结果。
现在明白了吧,这就是整个Python下的图像搜索引擎,看看这是如何执行的。
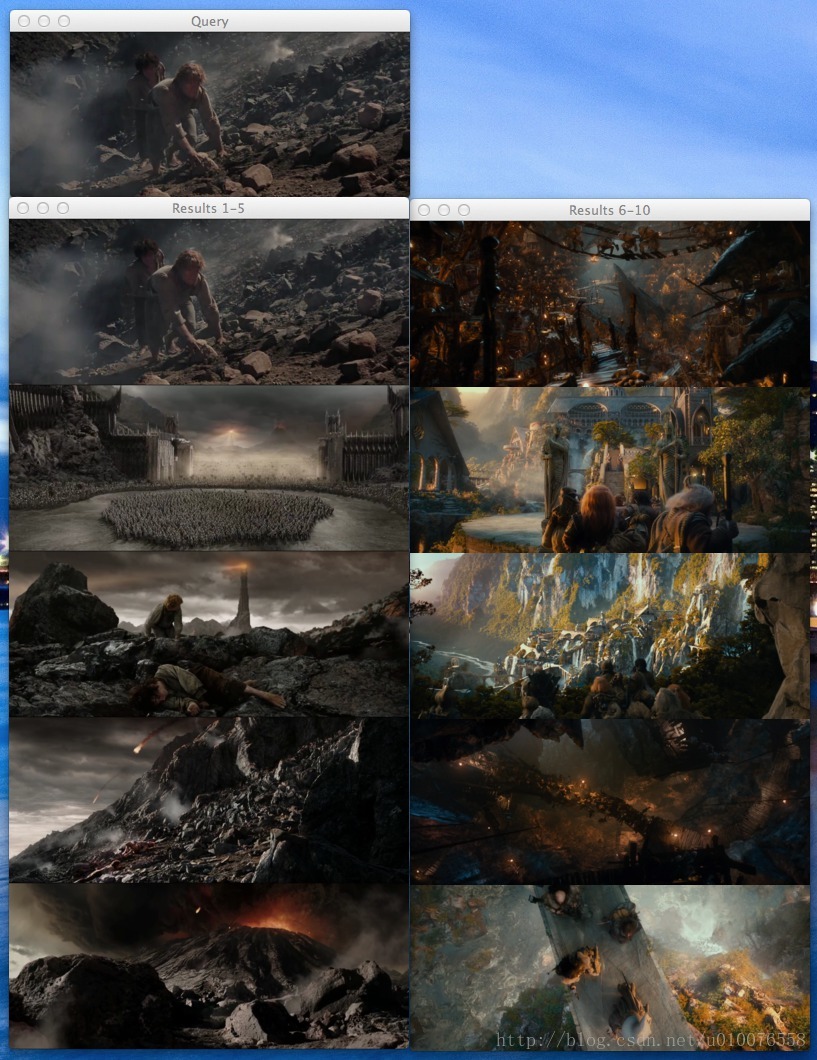
图2:Mordor-002.png 作为查询图像的结果。我们的图像搜索引擎是能够从Mordor和Black Gate返回结果图像的。
现在以“The Return of the King ”末段中Frodo和Sam升入火山开始作为查询图像。如图所示,5个“Mordor”类里最好的结果。
也许你还不明白为什么Frodo和Sam的查询图像也在搜索结果的第一位?回想一下我们的距离定义,如果两幅图像是一模一样的,那么距离为0。而且,我们使用的查询图像也在索引图像之中,那么它们的距离必定为0,出现在搜索第一位不足为奇了。
现在试试其他图像吧,The Goblin King in Goblin Town

图3: Goblin-004.png 作为查询图像的搜索结果
精灵王看起来不是那么高兴,但是我们却很高兴,因为这5个Gabin Down的搜索结果在前10个结果中。
最后是3个 Rivendell, The Shire和Dol-Guldur的示例搜索结果。如图所示,所有的各自类里的搜索结果都在整个样本的前10里。

图4: Dol-Guldur (Dol-Guldur-004.png), Rivendell (Rivendell-003.png),和The Shire (Shire-002.png) 作为查询图像的搜索结果。
Bonus:外部查询
到目前为止,我们只看到用存在索引里的图像的作为查询图像的搜索结果,但很明显,这不是索引搜索引擎都这么干,Google允许你上传你自己的图像,TinTye也如此,为什么我们不行呢?下面来看看如何搜索不在索引里面的图像。
-
-
from pyimagesearch.rgbhistogram import RGBHistogram
-
from pyimagesearch.searcher import Searcher
-
-
-
-
-
-
-
ap = argparse.ArgumentParser()
-
ap.add_argument("-d", "--dataset", required = True,
-
help = "Path to the directory that contains the images we just indexed")
-
ap.add_argument("-i", "--index", required = True,
-
help = "Path to where we stored our index")
-
ap.add_argument("-q", "--query", required = True,
-
help = "Path to query image")
-
args = vars(ap.parse_args())
-
-
-
-
queryImage = cv2.imread(args["query"])
-
cv2.imshow("Query", queryImage)
-
print "query: %s" % (args["query"])
-
-
-
-
-
-
desc = RGBHistogram([8, 8, 8])
-
queryFeatures = desc.describe(queryImage)
-
-
-
-
index = cPickle.loads(open(args["index"]).read())
-
searcher = Searcher(index)
-
results = searcher.search(queryFeatures)
-
-
-
-
-
-
-
montageA = np.zeros((166 * 5, 400, 3), dtype = "uint8")
-
montageB = np.zeros((166 * 5, 400, 3), dtype = "uint8")
-
-
-
-
-
-
-
(score, imageName) = results[j]
-
path = args["dataset"] + "/%s" % (imageName)
-
result = cv2.imread(path)
-
print "\t%d. %s : %.3f" % (j + 1, imageName, score)
-
-
-
-
-
montageA[j * 166:(j + 1) * 166, :] = result
-
-
-
-
-
montageB[(j - 5) * 166:((j - 5) + 1) * 166, :] = result
-
-
-
-
cv2.imshow("Results 1-5", montageA)
-
cv2.imshow("Results 6-10", montageB)
-
line 2-17:这些应该是觉得非常标准的东西了。导入了包,建立了我们的参数解析器,然而,还要注意新参数——query。这是查询图像的路径。
line 20-21:即将载入查询图像,显示图像,这可以防止你忘记你要查询的图像是什么模样。
line 27-28:用和在建立索引步骤里相同数量的bin实例化RGBHistoram。我用粗体和斜体表示就是为了让人明白用相同的参数是多么重要。然后就可以从查询图像提取特征。
line 31-33:使用cPickle从磁盘载入索引,执行搜索。
line 39-62:就像上诉的代码执行搜索,这里是显示结果。
在写这篇博客之前,我在Google下载两张不在我们的索引里面的图像,Rivendell 和The Shire各一。这两张图像作为我们的查询图像,搜索结果如下:
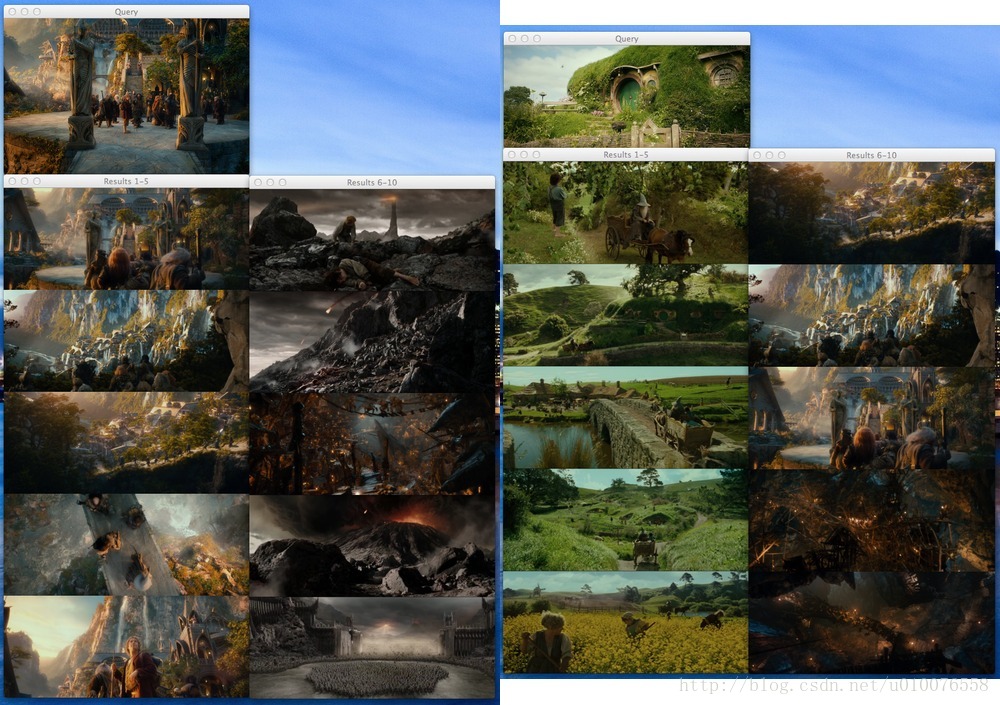
本例中搜索了用两张未见过的图像,左边的是Rivendell,可以看到系统返回了其他5张我们索引中的Rivendell结果图像。表明我们的搜索引擎工作不错。右边的是The Shire,结果再次证明我们的图片搜索引擎能返回语义相似的图像。
总结:
在本博文中,我们学习了如何从头到尾创建一个图像搜索引擎。第一步是选择图像描述子——这里使用三维RGB直方图来表征图像。然后我们通过使用描述子提取特征向量对数据集建立了索引。之后用卡方距离定义图像的相似度。最后,我们把这些连接起来创建了图片搜索引擎。
那么,下一步呢?
我们才刚开始,还只是完成图片搜索引擎的皮毛,博文中的技术还很基本,还有很多需要搭建。例如,我们只着力于用直方图抓取彩色,但是如何提取纹理、形状呢?神秘的SIFT描述子又是什么样的呢?
以上种种问题将在未来几个月里见分晓。
Python数据采集处理分析挖掘可视化应用实例教程
python把多个文件夹中文件合并到一个文件夹中 |