这篇教程Pytorch基础教程之torchserve模型部署解析写得很实用,希望能帮到您。
notetorch-model-archiver打包模型;利用torchserve加载前面打包的模型,并以grpc和http等接口往外提供推理服务- 自定义
handler类时initialize()、preprocess()、postprocess()和handle()这四个方法都是可选的
- 启动模型的api服务、
curl命令发送http post请求,请求模型服务API;流程和TensorFlow serving流程大同小异 torchserve是基于netty网络框架实现的,底层使用EpollServerSocketChannel服务进行网络通信,通过epoll多路复用技术实现高并发网络连接处理。
一、torchserve和archiver模块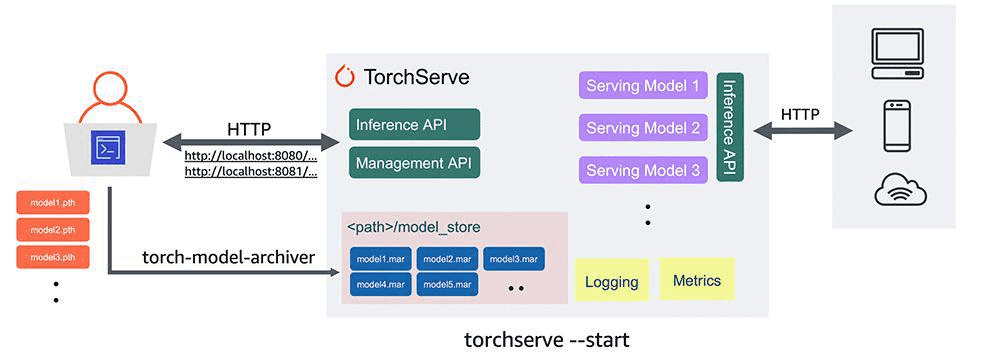
- 模型部署需要用到两个模块
- torchserve用来模型部署
- torch-model-archiver打包模型
pip: - torch-workflow-archiver - torch-model-archiver - torchserve
二、Speech2Text Wav2Vec2模型部署
2.1 准备模型和自定义handler- Wav2Vec2语音转文本的模型。这里我们为了简化流程从huggingface下载对应的模型,进行本地化利用torchserve部署
hander将原始data进行转为模型输入所需的格式;nlp中很多任务可以直接用torchtext的text_classifier。
# 1. 导入huggingface模型from transformers import AutoModelForCTC, AutoProcessorimport osmodelname = "facebook/wav2vec2-base-960h"model = AutoModelForCTC.from_pretrained(modelname)processor = AutoProcessor.from_pretrained(modelname)modelpath = "model"os.makedirs(modelpath, exist_ok=True)model.save_pretrained(modelpath)processor.save_pretrained(modelpath)# 2. 自定义handlerimport torchimport torchaudiofrom transformers import AutoProcessor, AutoModelForCTCimport ioclass Wav2VecHandler(object): def __init__(self): self._context = None self.initialized = False self.model = None self.processor = None self.device = None # Sampling rate for Wav2Vec model must be 16k self.expected_sampling_rate = 16_000 def initialize(self, context): """Initialize properties and load model""" self._context = context self.initialized = True properties = context.system_properties # See https://pytorch.org/serve/custom_service.html#handling-model-execution-on-multiple-gpus self.device = torch.device("cuda:" + str(properties.get("gpu_id")) if torch.cuda.is_available() else "cpu") model_dir = properties.get("model_dir") self.processor = AutoProcessor.from_pretrained(model_dir) self.model = AutoModelForCTC.from_pretrained(model_dir) def handle(self, data, context): """Transform input to tensor, resample, run model and return transcribed text.""" input = data[0].get("data") if input is None: input = data[0].get("body") # torchaudio.load accepts file like object, here `input` is bytes model_input, sample_rate = torchaudio.load(io.BytesIO(input), format="WAV") # Ensure sampling rate is the same as the trained model if sample_rate != self.expected_sampling_rate: model_input = torchaudio.functional.resample(model_input, sample_rate, self.expected_sampling_rate) model_input = self.processor(model_input, sampling_rate = self.expected_sampling_rate, return_tensors="pt").input_values[0] logits = self.model(model_input)[0] pred_ids = torch.argmax(logits, axis=-1)[0] output = self.processor.decode(pred_ids) return [output]在自定义 Handler 中,需要实现以下方法: - initialize: 用于初始化模型,加载权重等操作。
- preprocess: 用于将原始输入数据转换为 PyTorch 张量。
- inference: 用于执行模型推理。
- postprocess: 用于将模型输出转换为 API 输出格式。
2.2 打包模型和启动模型api服务- 可以直接在linux环境的terminal进行如下相关操作(打包模型、启动模型的api服务、curl命令发送http post请求,请求模型服务API)
- curl命令发送http post请求,请求模型服务API,如果遇到报错java.lang.NoSuchMethodError: java.nio.file.Files.readString(Ljava/nio/file/Path;)Ljava/lang/String;则应该是JRE没有安装或者需要升级:sudo apt install default-jre即可。
- curl那坨后正常会返回I HAD THAT CURIOSITY BESIDE ME AT THIS MOMENT%,测试数据是一段简单的sample.wav语音文件
- Waveform Audio File Format(WAVE,又或者是因为WAV后缀而被大众所知的),它采用RIFF(Resource Interchange File Format)文件格式结构。通常用来保存PCM格式的原始音频数据,所以通常被称为无损音频
# 打包部署模型文件, 把model部署到torchserve torch-model-archiver --model-name Wav2Vec2 --version 1.0 --serialized-file model/pytorch_model.bin --handler ./handler.py --extra-files "model/config.json,model/special_tokens_map.json,model/tokenizer_config.json,model/vocab.json,model/preprocessor_config.json" -fmv Wav2Vec2.mar model_store# 启动model服务, 加载前面打包的model, 并以grpc和http接口向外提供推理服务torchserve --start --model-store model_store --models Wav2Vec2=Wav2Vec2.mar --ncs# Once the server is running, let's try it with:curl -X POST http://127.0.0.1:8080/predictions/Wav2Vec2 --data-binary '@./sample.wav' -H "Content-Type: audio/basic"# 暂停torchserve servingtorchserve --stop
2.3 相关参数记录torch-model-archiver:用来打包模型 - model-name: 设定部署的模型名称
- version: 设定部署的模型版本
- model-file: 定义模型结构的python文件
- serialized-file: 设定训练模型保存的pth文件
- export-path: 设定打包好的模型保存路径
- extra-files: 设定额外的文件,如label跟id映射的定义文件等,用于一并打包到模型压缩包中
- handler: 为一个处理器,用来指定模型推理预测前后的数据的处理问题;如 nlp模型中的文本分词和转换为id的步骤;以及分类问题中,模型预测结果映射为具体的label等数据处理功能
torch-model-archiver:用来打包模型usage: torch-model-archiver [-h] --model-name MODEL_NAME [--serialized-file SERIALIZED_FILE] [--model-file MODEL_FILE] --handler HANDLER [--extra-files EXTRA_FILES] [--runtime {python,python2,python3}] [--export-path EXPORT_PATH] [--archive-format {tgz,no-archive,default}] [-f] -v VERSION [-r REQUIREMENTS_FILE]torchserve:该组件用来加载前面打包的模型,并以grpc和http等接口往外提供推理服务 - start 和 stop: 即推理服务的启动和停止;
- model-store: 打包模型存储的路径;
- models: 设定模型名称和模型文件名,如:MODEL_NAME=MODEL_PATH2 格式;
- no-config-snapshots: 即 --ncs,用来设置防止服务器存储配置快照文件;
Reference [1] https://github.com/pytorch/serve [2] Torch Model archiver for TorchServe [3] https://github.com/pytorch/serve/tree/master/examples/speech2text_wav2vec2 [4] https://huggingface.co/docs/transformers/model_doc/wav2vec2 [5] https://github.com/pytorch/serve/tree/master/model-archiver [6] pytorch 模型部署.nlper [7] cURL - 学习/实践 [8] Serving PyTorch Models Using TorchServe(by using transformer model for example) [9] 四种常见的 POST 提交数据方式 [10] TorchServe 详解:5 步将模型部署到生产环境 [11] PyTorch最新工具torchserve用于0.部署模型 到此这篇关于Pytorch基础教程之torchserve模型部署和推理的文章就介绍到这了,更多相关torchserve模型部署内容请搜索51zixue.net以前的文章或继续浏览下面的相关文章希望大家以后多多支持51zixue.net!
排序算法之插入排序法解析
Python+pandas数据分析实践总结 |
